
ESP32-CAM: Unlock Up To 11 GPIOs
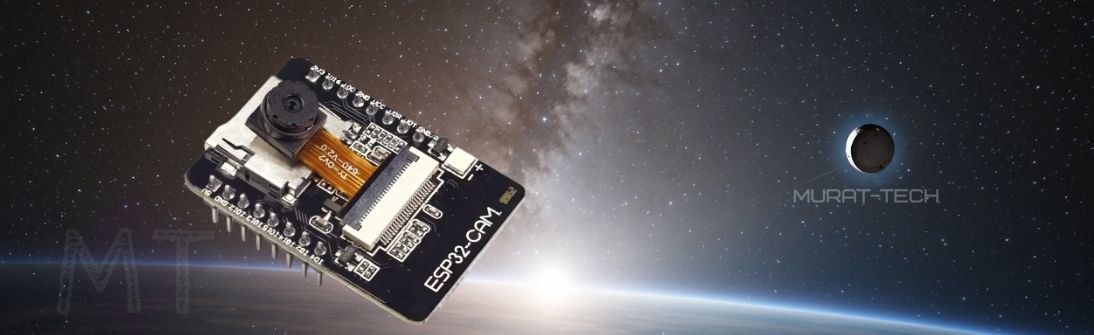
ESP32-CAM: Low-Cost Board, Great Projects
The ESP32-CAM is a powerful IoT board with Wi-Fi, Bluetooth, MicroSD, and camera support but one major drawback is the limited number of ESP32-CAM GPIOs available for projects.
In this guide, you’ll learn proven ways to unlock up to 11 GPIOs on the ESP32-CAM for your Arduino and IoT projects.
To make navigation easier, here are the main topics we’ll cover:
- What is GPIO and why are they limited?
- Freeing GPIOs via Software (1-Bit MicroSD Mode)
- Using External GPIO Expanders
- Hardware Hacks for More GPIOs
- Going Further: Adding Extra GPIOs without UART/MicroSD
- Anything Else? (GPIO0)
- Summary: How Many Extra GPIOs Can You Get?
- Final Thoughts
What is GPIO and why are they limited?
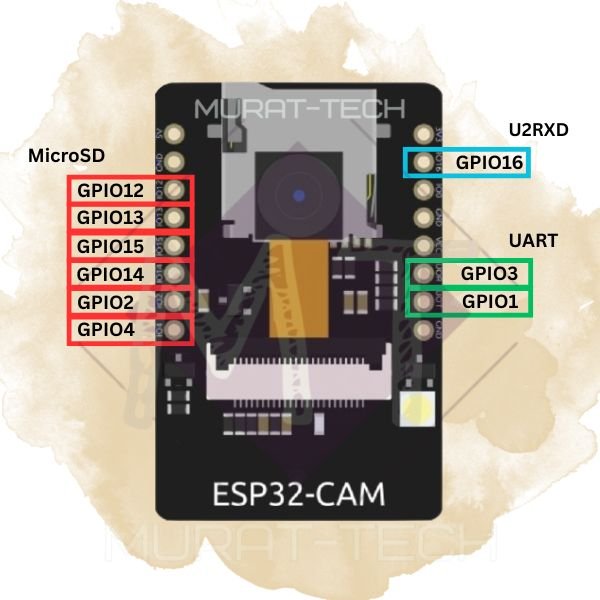
GPIO stands for General-Purpose Input/Output. On the ESP32-CAM, these pins are normally used to connect sensors, actuators, and other peripherals. However, many of them are already assigned to essential onboard components, including the camera module, flash LED, PSRAM, MicroSD card, and status LED.
This built-in usage is the main reason for the GPIO limitation on the ESP32-CAM.
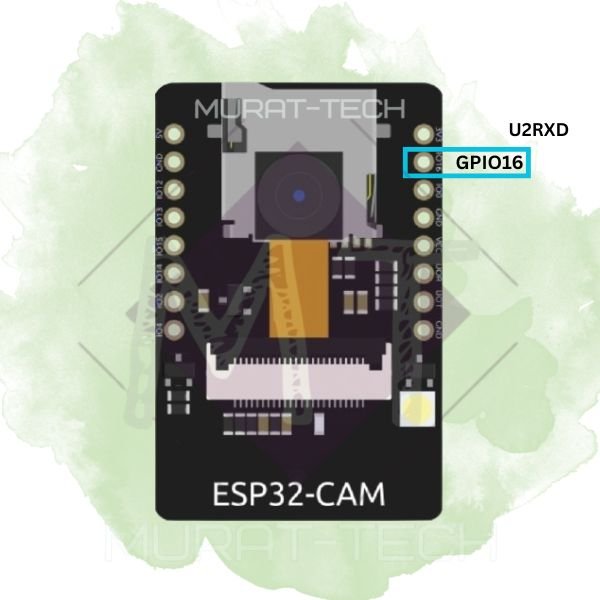
By default, the only freely available pin is GPIO16 – shown in this image.
But, this is too limited for most real-world applications…
Fortunately, there are several methods to free additional GPIOs without losing critical functionality. Let’s dive in!
⚠️ Disclaimer:
Remember that modifying GPIO assignments can affect stability.
Always test carefully and consider your project’s reliability requirements before using these ESP32-CAM GPIO hacks.
We at Murat-Tech Hub/ Channel are not liable for any resulting issues or losses.
Freeing GPIOs via Software (1-Bit MicroSD Mode)
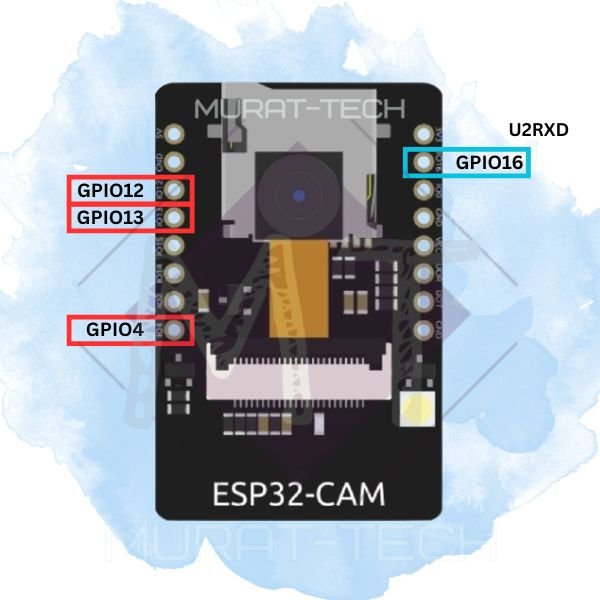
Did you know you can unlock 3 extra GPIOs on ESP32-CAM simply by running the MicroSD card in 1-bit mode instead of 4-bit? This frees GPIO4, GPIO12, and GPIO13, in addition to GPIO16.
⚠️ Important:
The trade-off is reduced SD card speed, so this option works best in projects where high-speed storage isn’t critical.
This is quite simple to achieve. In the Arduino IDE, select the correct board under Tools → Board → “AI Thinker ESP32-CAM” and add the following MicroSD initialization snippet to your code:
|
1 2 3 4 5 6 7 |
#include “SD_MMC.h” // Use ESP32-CAM’s high-speed SD/MMC hardware (not SPI) void initMicroSDCard() { Serial.println(“Mounting MicroSD Card…”); if (!SD_MMC.begin(“/sdcard”, true)) { //’true’ = 1-bit mode, ‘false’ or omit = default high-speed 4-bit mode. |
To use the newly freed GPIOs, simply define them as an Input or Output in the setup() function, just as you would in any standard Arduino project.
Below is an example of how to set up GPIO12. This method applies to any other available GPIO as well.
|
1 2 3 4 5 6 7 8 |
#define MY_GPIO 12 // GPIO12 void setup() { pinMode(MY_GPIO, INPUT); // in this case, GPIO12 is input digitalWrite(MY_GPIO, LOW); // init the GPIO12 in low or high } |
Depending on your project, you might still see the onboard flash LED blink weakly and randomly.
To prevent this when using GPIO4 as an output, you can force it to a low logic level, as shown below:
|
1 2 3 4 5 6 7 8 |
#define FLASH_LED 4 // GPIO4 void setup() { pinMode(FLASH_LED, OUTPUT); digitalWrite(FLASH_LED, LOW); // Keep the flash LED off } |
⚠️ Important:
GPIO4 is tied to the onboard Flash LED. In addition to the unwanted brightness when reusing it, you may encounter issues like parasitic current draw or false logic states.
To safely use GPIO4 on ESP32-CAM, you can physically disconnect the Flash LED with a small hardware mod. Advanced users may also take this opportunity to free up an additional GPIO.
Using External GPIO Expanders
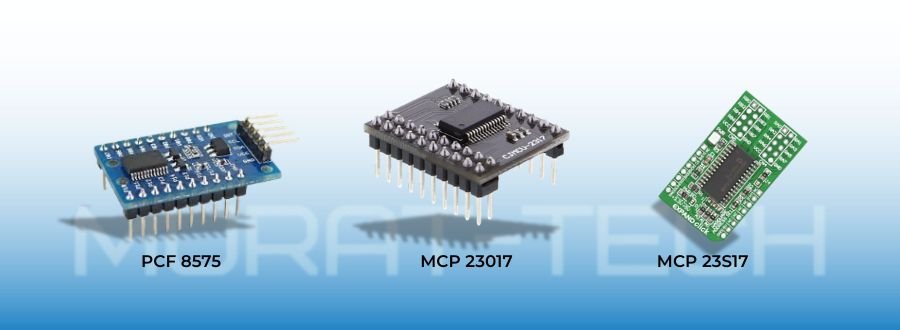
An interesting option is to add I²C GPIO expanders, such as the PCF8575 or MCP23017. If you need faster communication, you can use the MCP23S17 — which is very similar to MCP23017, but runs over SPI instead of I²C.
This is the simplest way to add GPIOs to ESP32-CAM without risks, making it ideal for projects with multiple sensors, so you can control multiple inputs and outputs using just 2–4 pins.
💡 Good to know:
I²C communication is especially suitable for the ESP32-CAM since it requires only two wires.
Either way (I²C or SPI), if you followed the procedure for 1-bit SD mode, you already have four available GPIOs, so you’re ready to go.
For more details and instructions you can check this post.
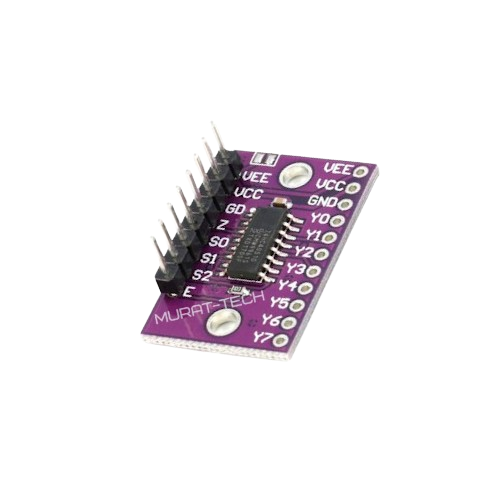
Another budget-friendly option is the 74HC4051 multiplexer, which doesn’t rely on I²C or SPI. Instead, it uses three digital selection pins to switch between eight analog channels, plus one additional pin for the signal line — requiring a total of four wires.
For more details and instructions, please check this post.
But keep in mind that external modules also have potential downsides that could be critical for your project:
- Power consumption increase (important in battery-powered projects)
- The need of extra physical space & wiring
- Additional libraries and code that reduce available memory and may impact performance
- Additional cost.
Fortunately, there are ways to avoid these issues by not using GPIO expanders. Keep reading to find out.
Hardware Hacks for More GPIOs
If you’re comfortable with soldering, you can free up pins by removing a couple of components. You can always solder them back on later if needed.
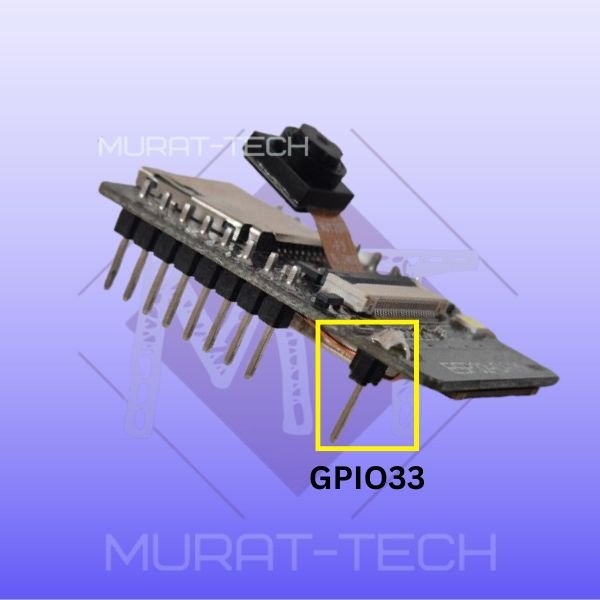
This hardware mod also gives you the opportunity to reclaim GPIO33.
Not much soldering practice?
Don’t worry — you can still completely free GPIO4 from the flash LED, making it safer to use this pin. Instead of desoldering, you can carefully cut a specific component using a small knife.
Not sure how to perform these modifications? Check out the step-by-step guide here!
Going Further: Adding Extra GPIOs (without UART/MicroSD)
GPIO1 and GPIO3 are typically used for programming the board, debug and/ or USART communication with other devices.
Not needed? You can configure them to function as regular GPIOs, freeing up two additional pins.
Not using the MicroSD card slot at all? You can reclaim all six of its associated GPIOs!
To use the GPIOs, simply set them up according to your needs, as shown in the GPIOs Definition code snippet above.
Anything Else? (GPIO0)
Yes. What if your project, such as data logging application, requires only the MicroSD card slot?
In this case, If you don’t need the camera, you can free up one more GPIO that’s already accessible on the header pins.
I’m talking about GPIO0.
⚠️ Important:
Since GPIO0 is typically reserved for boot mode, be sure to keep it HIGH during boot.
Afterward, you can safely reuse GPIO0 on the ESP32-CAM for additional functionality.
However, misuse may prevent the board from booting, deadlocking the device. Handle with caution.
Summary: How Many Extra GPIOs Can You Get?
Astonishingly, quite a lot!
Depending on your configuration, you can unlock between 4 and 11 GPIOs on the ESP32-CAM. The exact number varies depending on whether you disable the MicroSD card, camera, UART or onboard LEDs.
If you take it a step further and use external I²C or SPI GPIO expanders—especially by connecting them in cascade—you can dramatically increase the number of available GPIOs, limited only by the ESP32-CAM’s addressing capabilities.
The complete ESP32-CAM pinout diagram and GPIO reference table below show all possible combinations:

Does it make sense to use an ESP32-CAM without the camera and MicroSD module? Absolutely!
The table below covers this extreme situation, where you can still use the powerful ESP32 core, Bluetooth, and Wi-Fi for your project:
Final Thoughts
Although the ESP32-CAM looks limited at first, with the right software tricks and hardware hacks you can unlock up to 11 GPIOs for your projects — without needing external modules. This makes the ESP32-CAM one of the most flexible and cost-effective options for Arduino and IoT applications that require multiple sensors, actuators, or peripherals.
💬 Have you tried unlocking extra GPIOs on your ESP32-CAM?
Share your experiences or tips in the comments below — your insight might help other makers in the community!
Sharing what we learn and make is our passion. If you feel this effort is worth supporting, a small contribution helps sustain the creation of new tutorials and projects.
Support Us Here:

We appreciate your readership. See you in the next post!
ESP32-CAM: How to Unlock Up to 11 GPIOs © 2025 by Murat-Tech Hub is licensed under CC BY-SA 4.0 ![]()
![]()
![]()